Repair Order Maintenance |

|
The main center for tracking, viewing, adding and completing scheduled and non-scheduled vehicle and container repairs made by your company or outside vendors.
|

|
Navigate To: Maintenance>Repair Order MaintenanceOR Click the Tire-Clipboard Shortcut

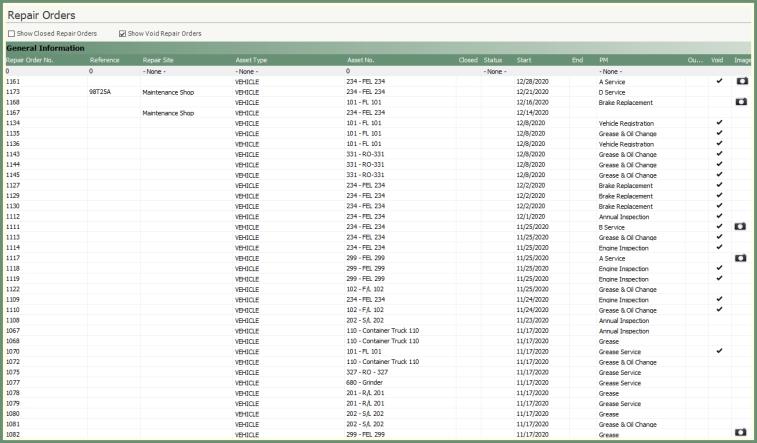
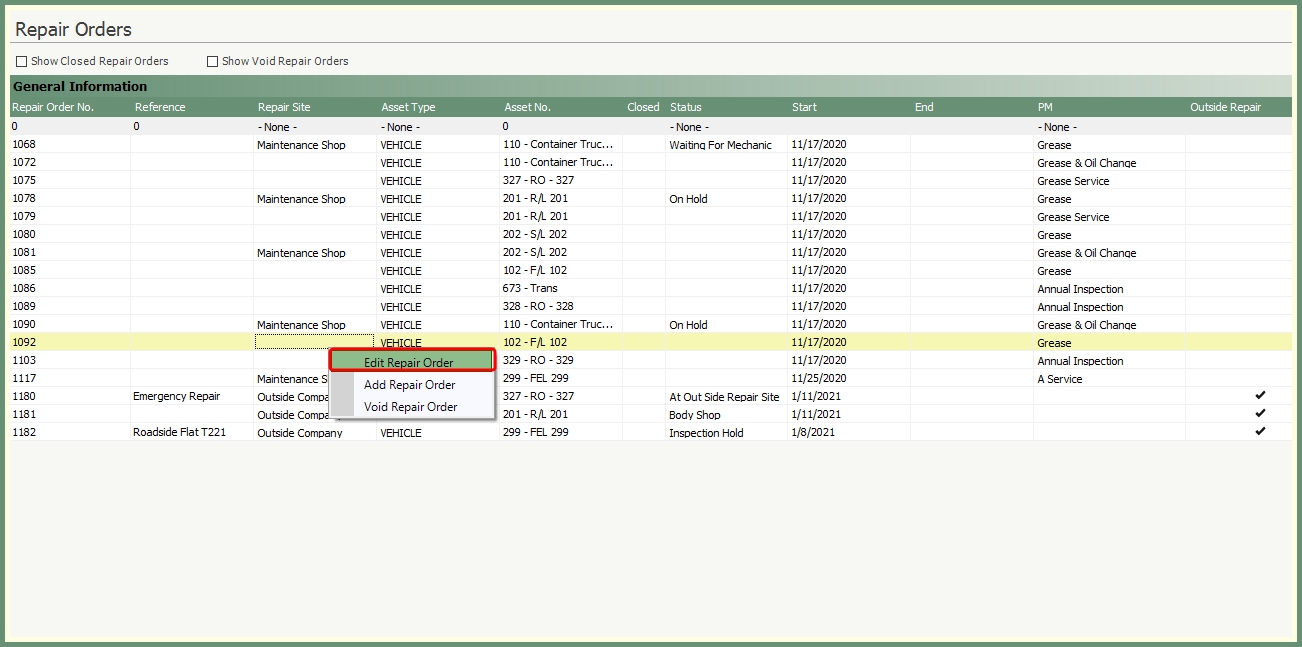
Repair Order Grid
View, sort and filter open, closed and voided repair orders in the grid.

-
The grid will default to all open repair orders.
-
To include closed and/or void repair orders, select the box above the grid

 .
. -
Sort the grid by any column header and columns can be re-sized.
-
Double click on the camera in the image column to view the image.
-
Use the top blank gray row to filter the grid by the content in any column by entering or selecting the specific repair order field information.
-
For example; enter a specific repair order number or select a specific repair site from the drop down
 .
.
-
Double click on a repair order to open the repair order.
-
Right click on a repair order to Edit, Add or Void.
Repair Orders should be added via Repair Order Maintenance for non- scheduled maintenance on equipment such as roadside emergency repairs, break/fixes or third party repairs. This allows your company to document who, what, when, why, duration, labor and parts by asset for records and reporting.

-
Click Add or right click on an existing repair order in the grid and select Add Repair Order.
-
Fields in green are required.
-
Required fields may vary based on company requirements.
-
Enter specific repair order number or press tab to assign the next available.
-
Select the repair order start date.
-
Enter reference as needed.
-
Vehicle asset type will be selected by default. Select container if the repair is for a container asset type.
-
Select the vehicle or container from the drop down and the type will automatically populate.
-
Selecting the vehicle or container type first will filter the options in the vehicle or container drop down if you chose to select from both.
-
Enter the odometer and engine hours as per your vehicle type meter reading selection. (Important for vehicle reading accuracy).
-
Enter a note as needed. Note entries will be included on the work order.
-
Select Repair Reason, Priority and Site from the drop downs.
-
Select an optional Failure Code.
See more about Repair Codes here.
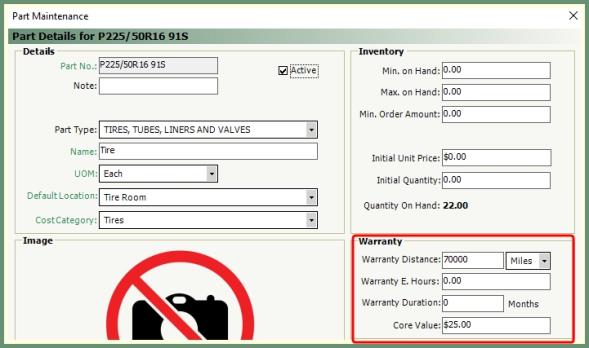
Associate inventoried or non-inventoried parts to this repair order to track inventory, costs and warranty.
|
Add Parts Options:
|
If a part has a warranty and is used on a repair order within the warranty distance/hours/duration; a prompt will be received to mark for core credit.
|

|

-
Warranty records starting point begins with the first time the part is assigned to an asset and uses the rule of Distance/E. Hours/Duration per warranty entry along with the current Odometer/Engine Hours/RO Start Date on the asset.
-
If a warranty credit is found, the user will be prompted to mark the part for warranty credit.
-
Core Value is the credit for parts to be issued when under warranty.
-
Core Credit checks for the value in Part Maintenance. If found, the user will prompt to apply the core credit to this repair order.
Assign a single or multiple employee's and/or vendors to a repair order to record time and cost.

|
|

-
Determine the Labor Time Entry method to be used. The recorded time can be the actual Start and End time (ex. 10:00 AM - 12:00 PM) or Number of Hours (ex. 2 Hours). This method can be changed for each repair order need in Company Settings.
-
Select employee's to apply labor time and cost.
-
Multiple employee's can be added to each labor subsystem.
-
Time for the same employee can be added multiple times by clicking the grey time box a second time, then click ADD to add the additional time. For example, 9-10am and then again 3-4 PM.
-
Only apply a vendor to the labor section if a labor credit is being applied.
-
Labor Costs and Credits will be subtotaled in the column to the right.
See more about Labor Codes here.
A To-Do List of individual open maintenance items to be repaired by asset. Backlogged items are associated to DVIR to create repair items from the driver and notify the driver of completed repairs.

-
Open repair items created via DVIR or added backlog items by the driver or service technician will display in the Backlogged Items grid if any exist for the selected asset
 .
.
-
If backlogged items are included in this repair order, select the include box.
-
Click Add Item to Backlog to create a backlog repair to be added to this asset.
See more about Backlog Priority Codes here.
-
Completed backlogged items created via DVIR will be shown to the driver in DVIR.
-
The Service Technician can select NRR (No Repair Required) for backlogged items that do not need repair. Driver will be notified via DVIR.
See more about DVIR here.
Designate the vendor used to perform the outside repair.
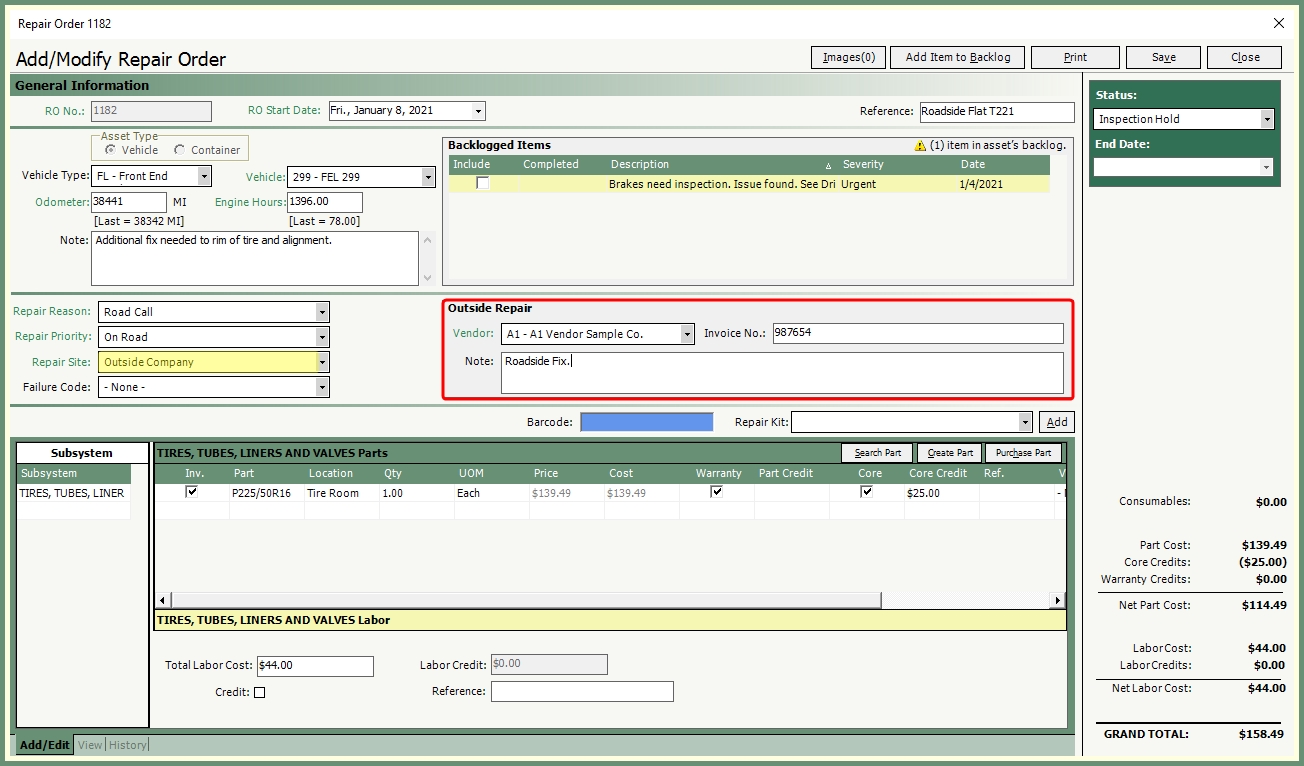
-
The Repair Order is created as usual with the addition of Outside Repair and Labor.
-
Select a Repair Site with Outside Repair enabled.

See more about Repair Site Codes here.
-
Parts can be added to the repair order as non-inventory, inventory or a generic part.
-
Non-Inventory: Adds the part to the repair order without subtracting the part from inventory.
-
Inventory: Your company supplies a part from your inventory and the vendor installs the part.
-
Generic Part: Apply the cost against a generic part created as Outside Parts.

-
Enter total labor cost, credits (if any) and reference.

-
Attach an image of the invoice from the vendor to the repair order.

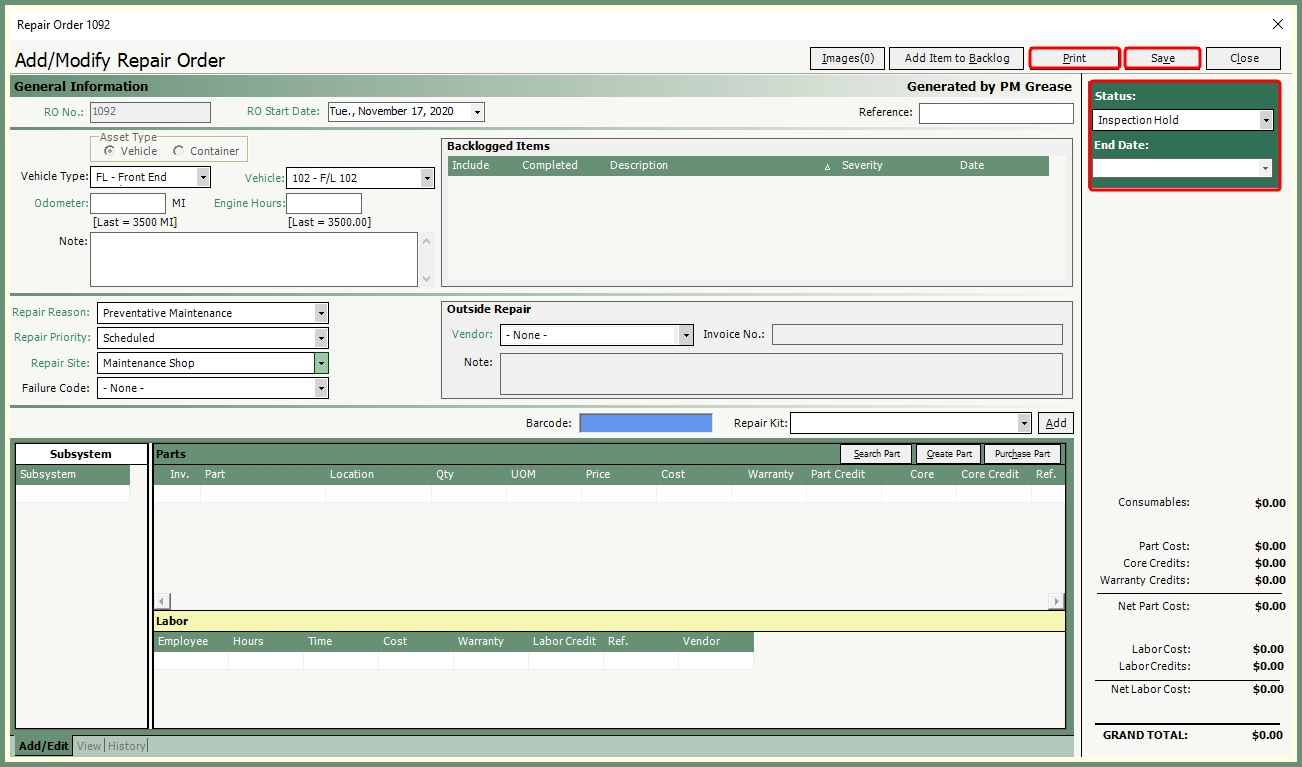
Save, Close & Print Repair Order
Repair Orders can be printed and saved and remain open or closed.
-
Select a status prior to saving (recommended).
See more about Job Status Codes here.
-
Select an End Date to close the repair order. To leave the repair order open, leave the End Date blank.
-
Click Save.
-
If the selected status has enforce close date enabled, the End Date will be required.
-
Click Print to generate a printed repair order.
Recall an existing open repair order to edit and save changes.
-
Right click on a repair order and select Edit Repair Order or Double Click to open.
-
Edit repair order.
-
Select a status (recommended).
See more about Job Status Codes here.
-
Click Save.
Repair Orders cannot be deleted but can be voided with the option to show voided repair orders in the grid.

-
Right click on a repair order and select Void Repair Order.
-
Confirm void.
-
Select a void reason.
-
Click Show Void Repair Orders to include voided repair orders in the grid. Voided repair orders will display as Void at the top of the repair order when recalled.

See more about Void Reason Codes here.
Maintain IT DVIR & Backlogged Items